ESP-12 Pin Overview

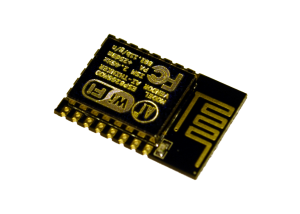
The ESP-12 has 16 pins broken out for the maker to use. A majority of them are simple GPIO pins, but others serve important dedicated purposes. These pins are:

  • TXD & RXD: Communication pins used to send (TXD) and receive (RXD) data. These pins will be used to program the device with new firmware and communicate with the running software.
  • VCC: The ESP must be supplied with 3.3V. Exceeding 3.3V will likely damage the device.
  • GND: Ground.
  • CH_PD: Chip enable. This needs to be pulled up to 3.3 V in order to power up the ESP.
  • GPIO 0: This pin is used to select which mode the ESP boots into. If it is pulled high, the system boots into the software that has been stored on its FLASH. If the pin is low, the system boots into the write mode, where new firmware can be burned. After the ESP has booted, this pin can be used for normal GPIO.
  • GPIO 2: This pin must be pulled high to boot the ESP.
  • RESET: This is an active-low reset pin. When it is pulled high, it does not impact the system, but when it is grounded it resets.
  • GPIO15: This pin must be pulled low to boot from FLASH or enter write mode. If this pin is high, the ESP will attempt to boot from SD card.
  • ADC: Analog to digital converter.
  • GPIO16: This pin is supposed to be used for the sleep mode and requires some in-program tweaking to use as a regular GPIO pin.

These simple rules are enough for experienced hackers to jump in and start playing with the ESP-12. Accessories such as this simple, cheap adapter plate or more advanced breakout boards from Adafruit and SparkFun take care of many of the pin settings.

Posted in ESP8266, Reference | Tagged , , | Leave a comment

The ESP8266: A (Very) Brief Introduction

The ESP8266 system-on-a-chip is one of the most exciting development platforms to appear on the market as of late. Produced by Espressif Systems, it contains a custom Tensilica 32-bit microprocessor as well as all of the hardware needed for Wi-Fi communications. It is available in a number of configurations, the most versatile being the ESP-12 (pictured below). The ESP-12 features 4 megabytes of memory, allowing for larger programs than previous iterations of the device. The earliest model, the ESP-01, only had 512 kilobytes of flash memory and as a result can not run the current version of the official “AT” firmware. Depending on which supplier the chips are purchased from, they come with either the stock AT firmware or (at least with our experiences with Adafruit) the lua-based NodeMCU firmware.

A stock ESP-12

Early in our design process we considered a number of chips, including solutions by Texas Instruments and Freescale. The ESP8266 provided a few tantalizing advantages over the other chipsets. It is already provided in small packages which are practically ready-to-use out of the box and can easily be integrated into our board designs. These packages even include a memory chip, rendering them truly complete systems ready to be programmed. They are ubiquitous, with many suppliers and people already using it for projects. The workflow is more adaptable, since the development process doesn’t require third-party IDEs and the compilation is handled by an implementation of gcc. Lastly, it was cheap.

Being a fairly new platform with limited documentation, programming for the ESP8266 often feels like forging a path on a new frontier. Luckily, there is a pretty dedicated Internet community working with the chip, centered on the ESP8266 Community Forum. Espressif also provides a forum where they communicate with developers concerning howtos, bugfixes and SDK releases. There is also a wealth of information on various maker\tech blogs and webzines that helped us considerably as we took our first steps. One of the purposes of this blog is to similarly provide some concentrated information about our experiences.

Posted in ESP8266, ESP8266 Community, OpenMYR | Tagged , , , , | 2 Comments

We Are OpenMYR

Welcome to the official OpenMYR devblog. We look forward to providing you with useful information about the ESP8266 development platform and our upcoming slate of products. Our goal is to provide a range of WiFi-enabled motors to be used in hobbyist projects, home automation, robotics and whatever other applications our imaginative customers can dream up! Furthermore, we wish to provide these products as open-source hardware and software, allowing for our work to be the basis of infinitely-customizable projects.

First organized as a project to develop an open-source 3D printer, OpenMYR is a group of likeminded individuals who love to create, code and challenge ourselves with fascinating projects. Founding members Kyle Berezin, an independent software contractor with a fascination for mechanical systems, and Chris Adams, an electrical engineer, brainstormed wireless motor packages as an innovative Internet of Things project that can solve several design problems using the same software codebase. Brandon Brown, an embedded software programmer finishing his degree at Rochester Institute of Technology, was invited onboard to round out the team. Together we have been working long nights prototyping the first offerings from OpenMYR’s line of open-source wireless motors.

In the coming weeks we plan on posting articles and videos about development using the ESP8266 system-on-a-chip as well as the process of bringing embedded systems projects to life. We hope you join us on our journey from basement startup through our upcoming Kickstarter and beyond.

Posted in OpenMYR | Tagged , , , , | Leave a comment